Instead of dealing differently with unwanted issues such as ‘performance, shut down, startup, memory, and apps issues’ that you’ve encountered with your Windows operating system from time and again; what best you can do is deal with them altogether by upgrading your Windows 10 with the latest version. And, the best option to upgrade your system is to perform a clean installation because if you’re having issues with your device, it helps you to start refresh by replacing the hard drive as well as by deleting viruses and any other kind of malware, etc from your system.
Also, to your surprise, doing a clean installation of the Windows 10 operating system is quite easy and simple as all you need to have is the license of your present Windows O.S. and a writeable DVD/USB flash drive with at least 4 GB of storage space available.
Now, as you’re ready to perform the clean installation process to upgrade your Windows 10 operating system, we’ve below mentioned the step-by-step guide of the entire process to help all the non-tech Windows users. So, continue reading further to perform the following steps correctly to upgrade or install Windows 10 absolutely free:
Step 1: Process to Prepare Computer for Clean Installation of Windows 10
In order to prevent loss of data during the clean installation of Windows 10 as the process erases everything on the main drive, you have to create a backup all your available files/data from your system. To do so follow these three options:
Option 1— Upload your Data (documents, pictures, and other files) to One Drive:
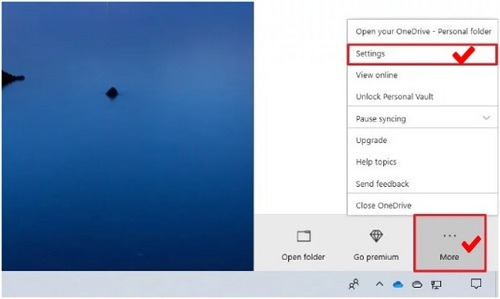
• From Windows ‘Taskbar’ click on the option of ‘One Drive.’
• Then, click on the ‘More’ menu in order to further click on the ‘Settings’ option.
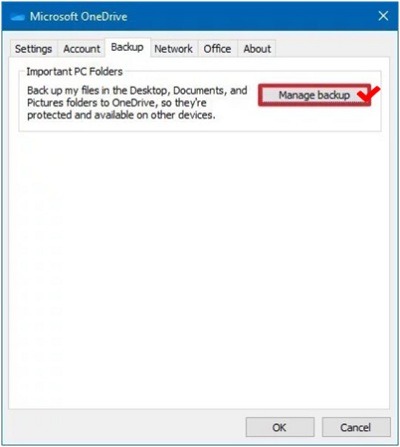
• From it, click on the ‘Backup’ tab and then click on the ‘Manage backup’ button in order to choose the data folders that you want to back up.
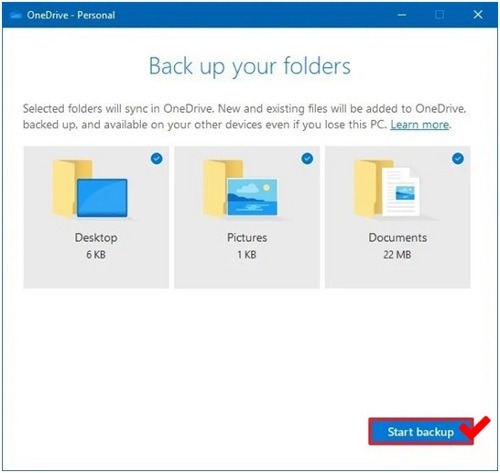
• Now, click on the ‘Start Backup’ button to upload data in the cloud (your online account).
Option 2— Copy your Data (documents, pictures, and other files) to External Drive:
• Click right on the ‘File Explorer’ in order to open it and paste this path “%HOMEPATH%” in its address bar.
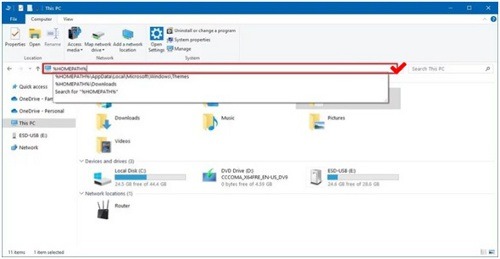
• Then, hit the ‘Enter’ button and from the ‘Home’ tab, click on the option of ‘Select all.’
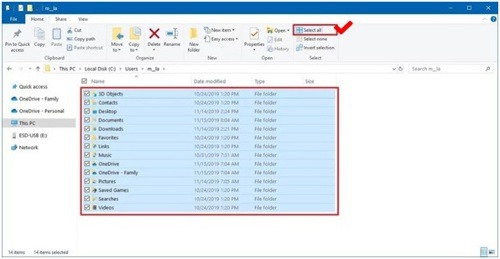
• After selecting all, click on the option of ‘Copy’ button from the same ‘Home’ tab.
• Now, select the ‘Choose location’ option in order to finalize the location where you want to copy your data.
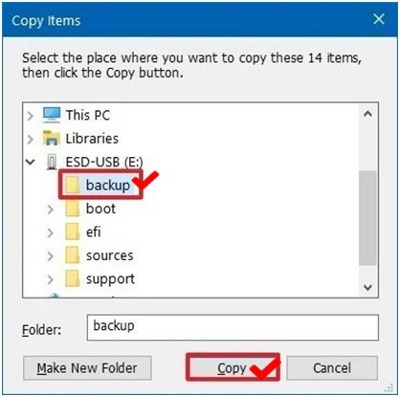
• That’s it! After selecting the destination location, click the ‘Copy’ button to finally copy your data to an external drive.
Option 3— Backup your Entire System:
Sometimes, with the help of previous options, you won’t be able to back up all your data. So, in order to create a full backup of your entire device, you can simply use the already available tool in your Windows 10 called i.e., ‘System Image Backup tool.’
Step 2: Meet System Requirement for Performing Clean Installation:
In order to perform a clean installation to upgrade Windows O.S., you need to meet the minimum requirements before starting to install the Windows 10 latest update. These requirements are as follows:
- Storage: 32-bit or 32 GB for 64-bit
- Memory: For 32-bit- 1 GB and for 64-bit-2 GB
- Processor: 1GHz or (SoC) i.e., System on a Chip
- Display: 800×600 screen resolution
- Graphics card: WDDM 1.0 driver or DirectX 9
Step 3: Make Sure your Windows O.S. is Activated
It is necessary to confirm once whether your system is activated or not before proceeding with the process of a clean installation. And, in order to confirm it, use these following steps:
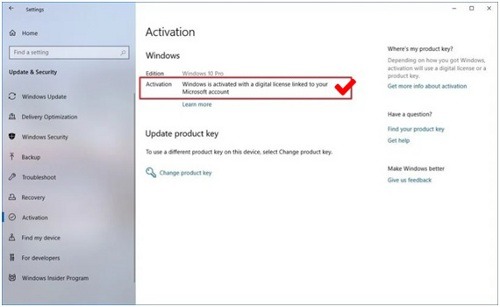
- Press ‘Windows Logo’ key to open ‘Windows Start Menu’ to reach its ‘Settings.’
- From there, click on the option of ‘Update and Security.’
- Under it, click on ‘Activation’ and then go to the ‘Windows’ section to finally confirm that now, your computer is activated. If not, then activate it using the next step.
Step 4: Get the Product key to Activate Windows O.S.
You need to purchase a valid license (product key) directly from the ‘Microsoft Store’ when you’re about to start installing Windows update on your system. However, if you don’t want to purchase it, you can install the product key for free to activate your Windows system. To do so:
- Open ‘Windows Run box’ by pressing the ‘Win + R’ key together.
• In the required text field of run dialog box type ‘cmd’ and hit ‘Enter.’
• Then, press ‘Ctrl+ Shift+ Enter’ together in order to open the command prompt and to run it as ‘Administrator.’
• After this, under the command prompt, paste this code “slmgr.vbs /upk” and hit the ‘Enter’ button.
• Then, paste another code “slmgr /ipk NPPR9-FWDCX-D2C8J-H872K-2YT43” and hit the ‘Enter’ button to install the Windows 10 product key.
• Now, again paste these two codes i.e., “slmgr /skms zh.us.to and slmgr /ato” and then, hit the ‘Enter’ button finally to activate the Windows 10 for free with the help of ‘CMD.’
Step 5: Install the latest Windows 10 update for your PC:
- Open ‘Windows Start Menu’ and click on the ‘Microsoft System Center’ option to reach ‘Software Center.’
- From there, simply click on the ‘Update’ section menu.
- After that, click on the ‘Install’ button to finally install the Windows 10 latest update.
- That’s it! After finishing the installation process with the help of following the on-screen instructions, just restart your Windows O.S. to apply the changes.
This is the entire step-by-step guide about how you can perform a clean installation of Windows 10 easily without the need for any further expert assistance. If you want to know more information about it visits “Way Binary”.


